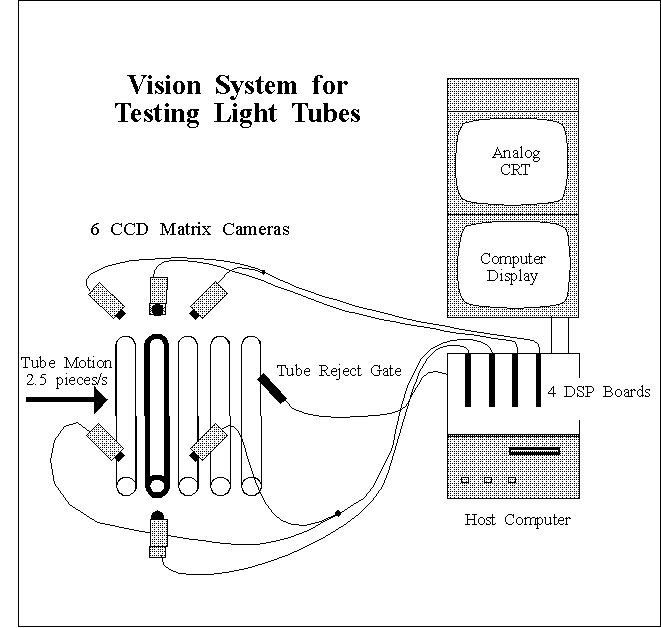

A real-time visual inspection system has been implemented at a glass plant of the GE-Tungsram company at Vác, Hungary to check glass tubes, especially their ends which are hot-formed for a given shape with fairly narrow tolerance.
The task is to check whether the tube end is broken or not and to measure whether the inevitable size differences exceed the allowed limits and to reject faulty parts. Since tubes arrive at a maximum rate of 250 pieces/min, human inspectors employed so far were unable to perform stable quality checking, and they could only roughly estimate the parameters to be measured.
The system does not apply any stopping mechanism. This solution proved to be robust and needs practically no maintenance. Tubes move continuously along their way during inspection and the parallel acquisition of the images is taken on the fly.
To realise thorough inspection, each end of each tube needs to be checked from four views using eight CCD cameras (6 matrix and 2 line cameras). The figure below outlines the arrangement of the 6 matrix cameras. The processing core contains an industrial PC equipped with our specially designed, DSP based frame grabber and image processing boards. All the image processing tasks are carried out by the DSP boards, the PC acts only as a host device, providing MS Windows based user interface, statistics, calibration utilities, system level control and detailed diagnostics on the state and settings of the end forming machine.

The measurements are to be carried out with 0.1 mm (0.004 inches) accuracy. This needs compensation for all possible secondary and ternary factors that might distort measurements (e.g. even an ideal end ring, appearing as ellipse on the image, is distorted by several factors, much of them varying with the actual position and wall thickness of the tube), while at the same time the measurement has to be robust enough to maintain tolerance of noise and non-optimal setting of the imaging system.
Starter Drive Quality Inspection System
A real-time quality inspection system has been implemented at the Alba Plant of the FORD Motor company at Székesfehérvár, Hungary to check each item of assembled starter drive parts at different phases of the assembly process.
Parameters to be checked are as follows:
Except torque curve analysis, measurements are based on optical methods using BW and colour CCD industrial matrix and line cameras at two checking stops along the assembly line. Automatic torque measurement is carried out at a third station.
The first checking station contains one BW matrix camera while the second station contains one colour matrix camera and two BW line cameras, respectively. Both checking sites are controlled by Cortex's Visual Signal Processor (VSP), which is a multi-DSP based visual microcomputer designed for stand-alone industrial image processing. The task of the VSP is to accomplish all the measurements and video signal processing, as well as to communicate with other controllers of the assembly line to facilitate process scheduling. Parameter settings can be done manually by the operator, or automatically under software control through the I/O channels connected to a host device. Besides the binary I/O channels the VSP contains standard synchronous and asynchronous serial interfaces for high speed communication with an external host or slave device. As an output device the controller also contains a graphical video monitor, which supports the parameter tuning of the whole system. By means of a well designed status page the whole process can be followed up on the screen during normal operation. Parameters to be checked can be individually enabled and disabled during normal processing. Results of the visual inspection can be a simple Go/NoGo signal to the operator accompanied with different geometrical data. Measurement results can also be transferred to a host device for further statistical data processing.
The goal of the torque inspection station is to check automatically each item of the assembled starter drive parts for torque specification. The system contains the following main units:
Torque measurement works as follows. The part arriving at the torque measuring station is pushed up from the conveyor to the single axis torque measuring nest by a pneumatic driven shaft. After reaching the fixed position the part is automatically rotated by a motor drive. The rotation generated torque signal is processed by the dedicated microcomputer. The output of the decision algorithm is a simple GO/NoGO signal: if the computed parameters of the rotation generated torque curve do not exceed predefined limits, the part passes the inspection and will be put back to the conveyor. If the part fails the inspection a rejecting mechanism will be activated. The system is fully automatic and does not need any direct human intervention.
The DSP based dedicated measuring and controlling microcomputer designed for this particular application is a stand-alone unit and can be programmed by means of push buttons and a menu system appearing on the LCD screen. The menu enables, among others, the definition of the accepting torque intervals. During measurement the screen is continuously updated by the current torque figures. In order to store the measured torque data or to make further statistical processing the system can be connected to a host computer via a serial line. Communication and synchronisation between the assembly line and the torque measuring station is supported by the built-in PLC unit of the measuring microcomputer.
(C) 1999. Cortex Ltd.